In this tutorial I am
going to show you how to create very quick and easy chocolate brown text effect
in only seventeen steps.
All you need to
achieve the final result is any version of Adobe Photoshop (Photoshop Elements
will do well too) and a little bit of passion while playing with the Blending
Options.
I have used Deftone
Stylus Font which you can download for free from http://www.fontsquirrel.com/. In Step 5 I have given you the Font link.
Now let's get down to
work. This is what you are going to create:

STEP 1
At first create a new
Adobe Photoshop .psd file and insert 1200px for Width and 700px for Height.
Choose 96 Pixels/Inch for Resolution (if you are to print the Text set it to
300 Pixels/Inch) and select Transparent for Background Contents in order to get
transparent and editable Layer 1. I have named my document Chocolate Brown
Text.
Rename also Layer 1 to
Background.

STEP 2
Navigate to the Tools
bar and Set the Foreground color to #8e5e4c. Use Paint Bucket Tool or Edit,
Fill, Foreground color to colorize the Background layer.

STEP 3
As our Background looks
flat now we are going to add some texture. Double click on Background layer
(Layer, Layer Style, Blending Options) and firstly check Pattern Overlay.
Change its settings like this:
Blend Mode: Overlay
Opacity: 30%
Pattern: Fine Grain (256 by
256 pixels, RGB mode)
Scale: 100%
Link with Layer: checked.
Keep Layer Style dialog box
active. We are going to apply Inner Shadow in the next step.

STEP 4
Tick Inner Shadow to add
Vignette Effect and apply these settings:
Blend
Mode: Multiply
Color of Shadow:
#000000 (black by default)
Opacity:
75%
Angle: 120
degrees
Use Global
Light: ticked
Distance:
0px
Choke: 0%
Size:
250px
Contour:
Linear
Anti-aliased:
unchecked
Noise: 0%.
We are ready with the
Background. Press OK button to close Layer Style box.

This
is how your Textured Background will look after implementing the previous two
steps:

STEP 5
Now we'll start
with the main part of this tut- creating the yummy text.
Download the
Deftone Stylus Font from here: http://www.fontsquirrel.com/fonts/Deftone-Stylus?filter%5Bclassifications%5D%5B0%5D=grunge&filter%5Bclassifications%5D%5B1%5D=retro.
Install the font
then select Horizontal Type tool from the Tools bar (or press T). From the Font
Family drop down menu choose the newly installed Deftone Stylus. Set the Font
Size to 180pt. Choose #532515 for Text Color then type Chocolate as you see on
the screenshot given for this step.
After you have typed the Text, select it
then click on Toggle the Character and Paragraph Panels icon in the Options bar
and Set the Tracking for the Selected Characters to 170.
Press Ctrl+G to place the
Text layer in a Group. Call the newly created Group Text.

STEP 6
Select the Chocolate Text
layer, right click on it, choose Blending Options and firstly tick Drop shadow.
Change its settings as follows:
Blend Mode: Multiply
Color of Shadow: #000000
Opacity: 75%
Angle: 120 degrees
Use Global Light:
checked
Distance: 4px
Spread: 20%
Size: 10px
Contour: Linear
Anti-aliased:
unchecked
Noise: 0%.
Layer Knocks Out Drop Shadow:
checked.
Keep Layer Style box opened.
We are going to apply three more Blending Options.

STEP 7
Check Inner Glow Layer Style
and apply the following settings:
Blend
Mode: Screen
Opacity:
77%
Noise: 0%
Color of
Glow: #fca445
Technique:
Softer
Source:
Center
Choke: 0%
Size: 55px
Contour:
Rounded Steps
Anti-aliased:
unchecked
Range:
50%.
Jitter: 0%.

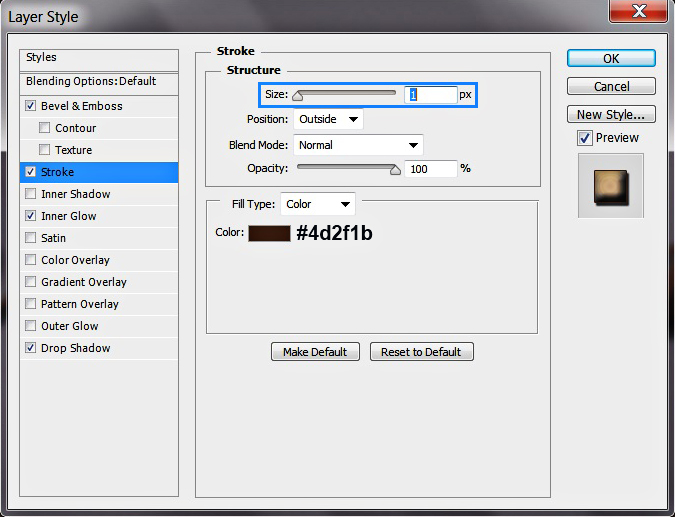
STEP 8
The third Layer Style to be
added to our Chocolate Text layer is Stroke. Insert these settings:
Size: 1px
Position:
Outside
Blend
Mode: Normal
Opacity:
100%
Fill Type:
Color
Color:
#4d2f1b.
STEP
9
Now
check Bevel and Emboss in order to create a slight 3D effect. Change its
settings like this:
Style:
Inner Bevel
Technique:
Smooth
Depth:
100%
Direction:
Up
Size: 13px
Soften:
0px
Angle: 120
degrees
Use Global
Light: checked
Altitude:
30 degrees
Gloss
Contour: Linear
Anti-aliased:
not checked
Highlight
Mode: Screen
Color for
Highlight: #8e5d16
Opacity:
100%
Shadow
Mode: Multiply
Color of
Shadow: #000000
Opacity: 75%.
Now press OK button to close
Layer Style box. Our work on Chocolate Text layer is completed.

This is how your Chocolate
Text will look so far. Still it looks more like made of caramel. J

STEP 10
While Chocolate layer is
selected, press Ctrl+J to duplicate it or right click on it and select
Duplicate Layer.
Reduce Fill Opacity of Chocolate copy layer to 0%. Right click on the copied layer and
select Clear Layer Style to get rid of the previously applied Blending Options.
Right click on Chocolate copy
layer again, select Blending Options and check Gradient Overlay in Layer Styles
box. Apply the following settings:
Blend Mode: Soft Light
Dither: unchecked
Opacity: 100%
Change the Gradient
Color stops like this:
First
Color Stop (Location 0%): #7b492e
Second
Color Stop (Location 100%): #bd5d00
Reverse: unchecked
Style: Linear
Align with Layer:
checked
Angle: 90 degrees
Scale: 100%.
Keep Layer Style box opened
as we have to add another five Blending Options.

STEP 11
The second Layer Style to be
added to Chocolate copy Text layer is Satin. Insert the following settings:
Blend Mode: Multiply
Color of Effect: #1e160b
Opacity: 60%
Angle: 19 degrees
Distance: 15px
Size: 13px
Contour: Log
Anti-aliased: unchecked
Invert: checked.

STEP 12
Now check Inner Shadow Layer
Style and change its settings like this:
Blend
Mode: Multiply
Color of
Shadow: #000000
Opacity:
75%
Angle: 120
degrees
Use Global
Light: ticked
Distance:
0px
Choke: 0%
Size: 13px
Contour:
Ring
Anti-aliased:
unchecked
Noise: 0%.

STEP 13
The next Layer Style to be
added to Chocolate copy layer is Stroke. Insert these settings:
Size: 5px
Position:
Inside
Blend
Mode: Normal
Opacity:
100%
Fill Type:
Color
Color:
#6a4125.

STEP
14
Now
check Bevel and Emboss Layer Style and insert the following settings:
Style:
Inner Bevel
Technique:
Smooth
Depth:
100%
Direction:
Up
Size: 13px
Soften:
0px
Angle: 120
degrees
Use Global
Light: checked
Altitude:
30 degrees
Gloss Contour:
Cove-Deep
Anti-aliased:
not checked
Highlight
Mode: Hard Light
Color for
Highlight: #8a5a16
Opacity:
100%
Shadow
Mode: Multiply
Color of
Shadow: #19130e
Opacity: 100%.

STEP 15
The last Layer Style to be
added is Texture. Change its settings as follows:
Pattern: Wood (64 by 64
pixels, RGB mode)
Scale: 480%
Depth: -87%
Invert: not checked
Link with Layer: checked.
Now press OK button to close
Layer Style box. We finished our work on the text.

STEP 16
That's all folks. In your
Layers panel you should have one separate Background layer and one Text Group
which consists of two Text layers: Chocolate and Chocolate copy.

STEP 17
Below you can see the final
yummy result saved in .jpg format. Thank you very much for reading this
tutorial. Hope you enjoyed it and found it easy to follow. :)


