From this
short tutorial you will learn from me fast and easy way to create
cool Medieval Style Text Effect with the help of layer styles and two
Tree Bark textures which are my own photos and unrestricted stock.
The Font I have used is Black Initial Text and you can download it
for free from http://www.1001freefonts.com/.
All
Photoshop versions are applicable.
This is
the result you should get if you follow all my twenty two steps:

STEP 1
Start your
work with creating a new Adobe Photoshop .psd document. Set its Width
to 1300px and Height to 900px. Type 96 Pixels/Inch for Resolution (if
you don't intend to print the outcome) and select Transparent for
Background Contents to get and editable first layer in your Layers
panel. Choose also RGB Color from Color Mode drop down menu.
I have
called my document Beautiful Medieval Text but you could use shorter
name.
Those of
you who prefer to print the Text when it is ready, should set its
Resolution to 300 Pixels/Inch and select CMYK Color for Color Mode.
Rename
your Layer 1 to Radial Gradient, then press Ctrl+G to place it in a
group. Call the group Gradient.

STEP 2
While
Radial Gradient layer is highlighted, navigate to the Menu bar and
firstly Set Foreground Color to #063a3a then Set Background Color to
Black- #000000.
Grab
Gradient tool and go to the Options bar. Select the first Foreground
to Background Gradient from the Gradient Picker and click on Radial
Gradient icon.
Now
drag with Gradient tool from the middle to a chosen corner of the
image.
Your
Background should resemble the result on my screenshot below after
being colorized with the Radial Gradient:

STEP 3
Click
on Tree Bark Texture 1 photo below in order to open it in high res in
a new window, then right click and select Save As to save the image
in the respective folder on your computer.
This
and the next Tree Bark Texture which you are to download are my
photos and unrestricted stock. You can use both of them for your own
projects if you like them.

STEP 4
Now
you have to Create a New Layer on top of Gradient group. Name it Tree
Bark Texture 1 and keep this new layer selected.
Open
in Adobe Photoshop the Tree Bark Texture 1 image which is already in
your folder, press Ctrl+A (Select All) to Load Selection on it then
press Ctrl+C to Copy it. Go back to your Beautiful Medieval Text.psd
document and press Ctrl+V to Paste the Texture in its layer (Tree
Bark Texture 1 layer). Well, the texture appears bigger than your
canvas, so go to Edit, Free Transform and drag any node in inner
direction in order to resize the texture to cover your canvas. Press
Enter to apply the Transformation.

STEP 5
Change
the Blend mode of Tree Bark Texture 1 layer to Multiply and you'll
get this result on your canvas:

STEP 6
Now
we'll start with the most important part of our tutorial- firstly
typing then beautifying the Medieval Text.
For
the purpose you have to download one super cool old style Font from
here: http://www.1001freefonts.com/black_initial_text.font.
Install
the font then select Horizontal Type tool from the Tools bar (hot key
T). From the Font Family drop down menu choose Black Initial Text
Font you have already downloaded and set its Font Size to 250pt.
Choose #dcdd6f for Text Color then type The King using Capital
Letters and Center Text option checked.
The
Tracking for the Selected Characters should be set to 100.
Press
Ctrl+G to place the The King Text layer in a Group. Name this newly
created Group Text.

STEP 7
While
your Text layer is selected, press Ctrl+J to make one duplicate.
Reduce Fill Opacity of The King copy layer to 0%.

STEP 8
Go
back to the original Text layer (The King), right click on it and
select Blending Options to activate Layer Style dialog box.

STEP 9
The
first Layer Style to be applied on The King layer is Drop Shadow.

STEP 10
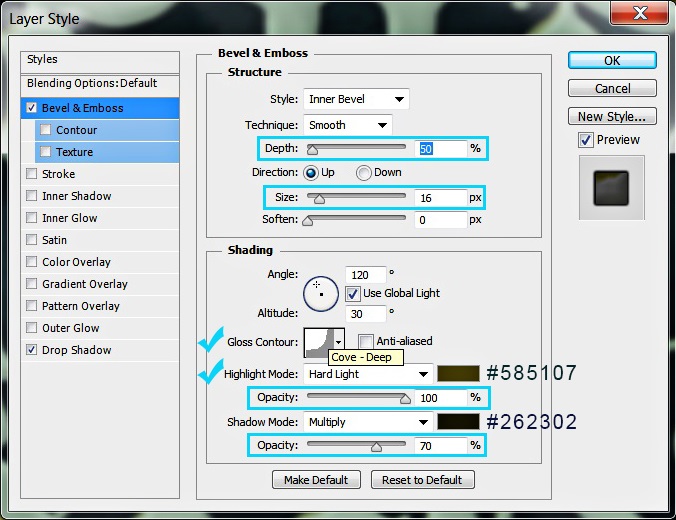
Now
tick Bevel and Emboss Layer Style to add 3D look to our Medieval
Text.
STEP 11
The
third Layer Style we have to apply on The King layer is Contour. It
will improve the Bevel and Emboss Effect.

This
is how your Medieval Text will look after adding the three Blending
Options.

STEP 12
Now
we'll start to apply layer styles on the duplicated Text layer so
select The King copy layer, right click on it and choose Blending
Options then firstly tick Gradient Overlay in Layer Style box. Select
the default Gold Gradient from the Gradient Picker.

STEP 13
The
second Layer Style that is to be applied on The King copy layer is
Inner Shadow.

STEP 14
Let
us add awesome relief to our Medieval Text. For the purpose tick
Bevel and Emboss Layer Style.

STEP 15
The
last Layer Style we have to add on The King copy layer is Contour.
Choose Rolling Slope-Descending from the Contour Picker and change
Range to 65%.

This
is how our Medieval Text will look so far:

STEP 16
It
is time to download Tree Bark Texture 2. See Step 3 for reference.

STEP 17
Create
a New Layer on top of Text group and name it Tree bark Texture 2.
Paste the Texture downloaded in the previous step in this new layer
(see Step 4).
Use
Edit, Free Transform to resize the Texture so that it covers the
Text. Press Enter to apply the Transformation.

STEP 18
While
Tree Bark Texture 2 layer is selected, hold down Ctrl and click on
The King layer's thumbnail to Load Selection on the Text. Click on
the screenshot below to open it in high res for a better visibility
because the colors of the Texture prevent from seeing the Selection
clearly.

STEP 19
With
Tree Bark Texture 2 layer selected and Selection on the Text active,
click on Add Layer Mask button at the bottom of Layers panel (Layer,
Layer Mask, Reveal Selection).

Your
result should be similar to the one on the screenshot below after
adding Layer Mask to Tree Bark Texture 2.

STEP 20
Change
the Blend Mode of Tree Bark Texture 2 layer to Overlay.

STEP 21
Double
click on Tree Bark Texture 2 layer's thumbnail to call Layer Style
box. Apply Outer Glow Layer Style to make the borders of the Texture
look hot. :)

We
finished our work on the Medieval Text. You should have these two
groups in Layers panel:
- Gradient Group with two layers in it: Radial Gradient and Tree Bark Texture 1 and
- Text group which consists of three layers: The King, The King copy and Tree Bark Texture 2 layer.

STEP
22
This
is my Medieval Text saved in .jpg format. You can improve the look of
your .jpg file with Filter, Sharpen, Unsharp Mask.
Hope
you find this tutorial interesting and easy and like the outcome.
Many thanks for reading and God bless!
Please,
leave a comment below if you have questions or critiques. :)


