From this
Photoshop tutorial you will learn how to create simple Retro Style
Badge with the help of Tree Bark Texture applied on the Background
and Waffle and Lead-horizontal patterns- both are default for the
program.
In the
process of our work we'll be using Polygon and Ellipse tool, Layer
Styles and Custom Shape. We are also going to type Text on Path.
The
Tree Bark Texture is my own photo and unrestricted stock so you can
use it for your works if you like it.
You can
create this Retro Badge in any Photoshop version.
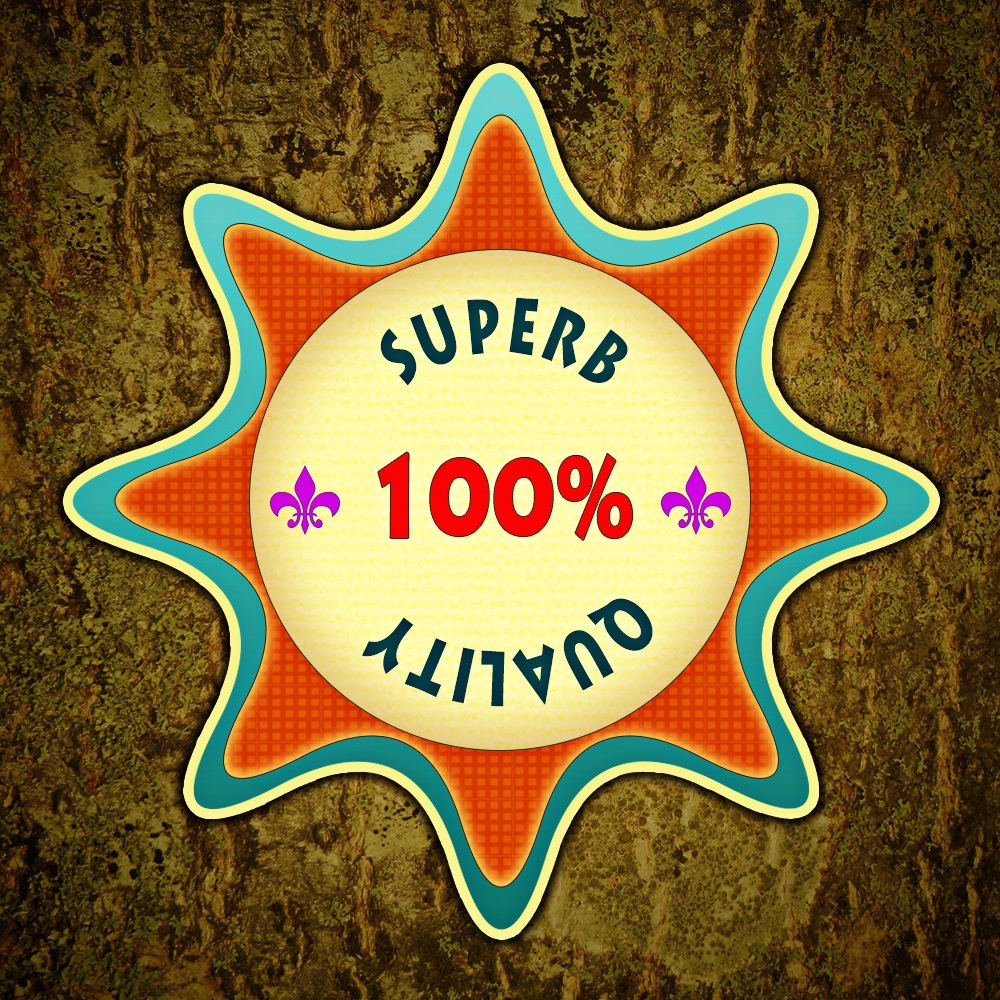
This will
be your outcome if you follow all my steps:
STEP 1
Start your
work with creating square .psd document of 1000 Pixels both Width and
Height. Call it Retro Badge, set its Resolution to 72 or 96
Pixels/Inch, choose RGB Color for Color Mode and Transparent for
Background Contents.
Rename
Layer 1 to Radial Gradient and place it in a group (Ctrl+G) called
Background.

Create
Textured Background and Drag Guides
In Steps
2-7 you have firstly to colorize the Background with Radial Gradient,
then you have to download awesome Tree Bark Texture which you are
going to crop.
After that
you have to activate the rulers and drag two guides which will help
you to place your shape in the center of the canvas.
STEP 2
Select
Radial Gradient layer then Set Foreground Color to #af8b35 and
Background Color to #151201. Take Gradient tool from the Tools bar
(or press G), select Foreground to Background Gradient from the
Gradient Picker in the Options bar and click on the Radial Gradient
icon. Drag from the middle to any chosen corner of the canvas to
colorize it with the Radial gradient. Your result should resemble my
screenshot below:

STEP 3
In this
step you have to download this cool Tree Bark Texture covered with
lichen. Simply click on it to open it in high res, then right click
and choose Save Image As to place it in your folder.

STEP
4
Open
the Texture in Adobe Photoshop, select Crop Tool, Set its Custom
Aspect Ratio to 1000/1000px then crop the Texture.

STEP 5
Create a
New Layer on top of Background group in your Retro Badge file and
name it Tree Bark Texture.
While
the Tree Bark Texture is opened in Photoshop, press Ctrl+A to select
its image then press Ctrl+C to Copy it.
Return
to your Retro Badge document, select Tree Bark Texture layer and
press Ctrl+V to Paste there the downloaded Texture. As the cropped
Texture is the size of your canvas (1000/1000px), you don't need to
resize it with the help of Free Transform. It should fit perfectly to
your Background.

STEP
6
Change
the Blend Mode of Tree Bark Texture layer to Soft Light.

STEP
7
In
this step for your convenience you should drag two guides
intersecting in the middle which will help you in the process of work
to place your objects centrally on your canvas.
For
the purpose firstly navigate to the Menu bar and select View, Rulers.
When Rulers appear around your canvas, check if they are set to
Pixels. If not, go to Edit, Preferences, select Units&Rulers,
then choose Pixels from Rulers drop down menu.
Go
back to View but this time select New Guide. Insert 500 Pixels for
Vertical Position to get your first vertical guide. Go again to View,
New Guide but this time check Horizontal for Orientation and insert
again 500 Pixels. Now you should have two intersecting guides.
Activate
also the Smart Guides- View, Show, Smart Guides.

Use
Polygon and Ellipse Tool to Create the Badge
In
Steps 9-21 your work is to draw two eight sided polygons and one
circle then you need to add lots of Blending Options to them in order
to create the final attractive look of the Retro Badge.
STEP
8
Create
a New Layer named Polygon 1 at the top of your Layers panel. Place it
in a group called Badge.
Set
Foreground Color to #35aea4 and while Polygon 1 layer is selected, go
to the Tools bar and choose Polygon tool. Navigate to its Options bar
and set its Mode to Pixels. Insert 8 for Sides and click on the Gear
icon. Insert there 500px for Radius, check Smooth Corners and Star
options, Indent Sides By 50% and also tick Smooth Indents option.
Draw your Polygon and use the help of Move tool and the Guides to
place the shape in the middle of your canvas.

STEP
9
Double
click on Polygon 1 layer's thumbnail in order to activate Layer Style
dialog box (Layer, Layer Style, Blending Options). Firstly you have
to apply Drop Shadow so tick it, then lower its Distance value to
0px. Increase Spread to 65% and Size to 25px.
Don't
close Layer Style box because we need to add more Blending Options.

STEP
10
Now
tick Gradient Overlay Layer Style, set its Blend Mode to Soft Light,
click on the Gradient swatch and select Black, White Gradient from
the Picker, then set the Angle to 90 degrees.

STEP
11
We
are going to add tick yellow border to our Badge so check Stroke
Layer Style, increase its Size to 10px and Set Color of Stroke to
#f8f17f.

This
is how our Retro Badge will look after applying all Blending Options
to its first layer.

STEP
12
Create
a New Layer on top of Badge group and call it Polygon 2.
Set
Foreground Color to #ffb65f then select Polygon tool in Pixels Mode,
leave its Sides to 8 (as we previously set them), then click on the
Gear icon and change the Radius to 450px. Leave all other options as
we set them for the first Polygon.
Draw
the light orange Polygon as you see on the screenshot below.

STEP
13
Double
click on Polygon 2 layer's thumbnail to call Layer Style box and
start with checking Pattern Overlay Layer Style. Change its Blend
Mode to Linear Burn, and choose Waffle (64 by 57 pixels, RGB mode)
from the Pattern Picker.

STEP
14
Let
us lighten the borders of Polygon 2. Tick Inner Glow Layer Style, Set
Color of Glow to #f9d061 and increase the Size to 20px.

STEP
15
Now
tick Stroke Layer Style, reduce its Size to only 1px and Set Color of
Stroke to #4b2d07.

This
is the result after the work we have done on Polygon 2 layer:

STEP
16
Create
a New Layer on top of Badge group and name it Ellipse.
Set
Foreground Color to #fffa9f, then select Ellipse tool in Pixels Mode.
Click on the Gear icon, tick Fixed Size and insert 500px for both
Width and Height.
Your
circle should look like this when you place it in the middle of the
canvas:

STEP
17
You
can suppose that Blending Options will come right now. Firstly apply
Pattern Overlay on the Ellipse layer. Change the Blend Mode to Soft
Light and choose Laid-horizontal (256 by 256 pixels, RGB mode).

STEP
18
The
next Layer Style we have to apply on Ellipse layer is Inner Shadow.
Set Color of Shadow to #b97429, then lower Distance to 0px and
increase Size to 70px.

STEP
19
The
last Layer Style we have to add to the yellow circle is Stroke.
Change its Size to 1px and Set Color of Stroke to #4f4707.

This
is how our Retro Style Badge will look so far:

Add
Text on Path and Custom Shape
From
the next step till the end of the tut you have to type some Text
which purpose is to attract potential customers. After that you have
to add small decoration, using Custom Shape tool.
STEP
20
Now
grab Horizontal Type tool (hot key T), select Lithos Pro Font from
Font Family menu in the Options bar, Set the Font Style to Black and
Font Size to 72pt then insert #fa0202 Color Code for Text Color and
type 100%.
Highllight
your 100% Text and go to Window, Character. In Character box set the
Tracking to 10, then insert 120% for Vertically Scale and 80% for
Horizontally Scale.
Move
your 100% Text layer on top of Layers pane and place it in a group
named Text and Custom Shape.

STEP
21
Right
click on the Text layer and select Blending Options. Tick Drop Shadow
Layer Style, reduce Distance to 0px, then change Spread to 50% and
Size to 1px. This will create awesome thin dark stroke for the Text.
As you can see strokes can be added not only with the help of Stroke
Layer Style.

This
is the result of applying Drop Shadow on the Text layer.

STEP
22
Create
a New Layer on top of Text and Custom Shape group.
Select
again Ellipse tool but this time set its Mode to Path. Click on the
Gear icon, tick Fixed Size and insert 300px for both Width and Height
to create a circular Path.
Use
Edit, Free Transform Path to place the Path in the middle of the
canvas. Press Ctrl+J to duplicate the Path layer.

STEP
23
Select
Horizontal Type tool and use the same Lithos Pro Font to type Superb
on the Path, using Capital Letters. Change only the Font Size to 48pt
and Text Color to #075653.
Use
the same Font with the same settings to type Quality on the
duplicated Path layer as you see on the following screenshot.
I
don't recommend you to rasterize these two Text layers. Better leave
them editable, because later you might decide to use another Font
with different settings if you don't like mine.

STEP
24
Create
a New Layer on top of Text and Custom Shape group named Fleur-De-Lis
after the Custom Shape we are going to use.
Set
Foreground Color to #d200de. Take Custom Shape tool in Pixels Mode,
find Fleur-De-Lis Shape in the Custom Shape Picker and set its Fixed
Size to 70px both Width and Height. Place the shape at the right side
of the yellowish circle as you see on the screenshot below.

STEP
25
Apply
Stroke Layer Style on the Fleur-De-Lis Shape. Set Stroke Size to 1px,
choose Inside for Position and insert #9e21b1 Color Code for Stroke
Color.

This
will be the result on your canvas after adding subtle stroke to the
Fleur-De-Lis Shape:

STEP
26
While
Fleur-De-Lis layer is selected, press Ctrl+J (Layer, Duplicate Layer)
to make a copy of it. Move the duplicated shape at the opposite side
of the Ellipse.
With
this we finished our work on the Retro Badge. You should have these
three groups and layers in Layers panel (from bottom to top):
- Background group with two layers in it: Radial Gradient and Tree Bark Texture;
- Badge group which includes three layers: Polygon 1, Polygon 2 and Ellipse and
- Text and Custom Shape group with four layers in it: 100% and Superb Text layers, Fleur-De-Lis and Fleur-De-Lis copy layer.
As
you don't need the Guides anymore, go to View, Show and uncheck
Guides to make them invisible.

STEP
27
This
is my Retro Style Badge saved in .jpg format.
Hope
you find this tutorial useful and learned new things from it.
Thank
you very much for reading and God bless! :)

No comments:
Post a Comment